Lack of lighting can totally ruin your videos. Capturing the perfect video in low light conditions can be extremely challenging without the right tips and tricks. Typically, the result is grainy, desaturated, low-contrast and fuzzy footage.

How to Shoot Video in Low-Light
- Try adding extra light
- Use the darkness
- Use the largest aperture
- Reduce frame rate
- Reduce shutter speed
1. Try adding extra light
If you are having trouble shooting in dark or low light conditions, try moving your subject closer to the ambient light source. Getting your subject close to as much additional light as possible will greatly help your video quality.
If you just don’t have another light source, invest in additional lighting. This light is attached to your camera and directly illuminates the subject you are trying to capture.
The Genaray LED-7100T 312 LED Variable-Color is great for helping to make your video less grainy and richer in color. People usually think that when shooting in low light, it is enough to increase the ISO. Although this is a good technique, it gradually increases the exposure of the footage in the absence of real illumination of the subject, but it does flatten the footage.
Increasing the sensitivity of your camcorder will add noise to the shadows of your video. It distracts viewers. Avoiding increasing ISO is the best option if you have extra light available.
Other options include turning on overhead lights or lamps, using a reflective panel or mirror to move and reflect light on an object, or even purchasing a portable lighting kit.
The BOLING BL-2220P Portable Continuous LED Video and Photo Lighting Kit will likely be the most expensive investment, but will provide the most light no matter what environment you are shooting in. In addition, this set is rechargeable, which means you can take them with you wherever you want to shoot.
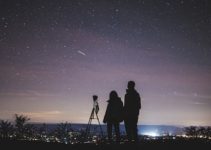
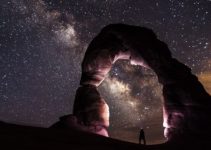
2. Use the dark
A second tip for improving quality when shooting in low light is to use the surrounding darkness to your advantage. Basically, this means that the subject you are shooting does not always have to be in the center of the frame.
The subject can always be seen through the silhouette when the atmosphere is enough to interest the viewer in the clip. While adding extra lighting to your subject will help improve visibility and quality, this technique does not need to be used every time you shoot in low light.
If the background or atmosphere surrounding the subject is aesthetically pleasing to the audience, it is sometimes best to leave the main focus on the landscape and keep the subject in the dark. Exposing the background and a semi-dark or completely dark subject can effectively engage the viewer by creating a creative effect. Seeing the subject’s face, expression or details will not affect the viewer’s attention.
3. Use the largest aperture
Depending on which camcorder you are using for shooting, you can change the camera settings to improve the video quality. If your camcorder has an aperture setting, change this setting to the lowest setting possible. The 1.4 aperture is amazing. By lowering the aperture number on the camera, you increase it. With a larger aperture, more light enters the camera, creating a brighter image.
This is a great feature to know when shooting in low light conditions. Remember that when using a zoom lens, the minimum aperture value available increases as the subject gets closer. The more you zoom in, the less opportunity you have to brighten the picture.
By holding the camera lens at the wide-angle position, you get more light than a zoom. If you want to shoot in low light without getting grainy, faded footage when you zoom in on your subject, just move closer to it. Try not to use the camera zoom and just physically move closer to the subject.
4. Reduce the frame rate
If your camera model allows you, try changing the frames per second. Usually all cameras are set at 30fps, although 24fps will shoot sharper video when shooting in low light conditions. The lower frame rate brings more light into the camera, making the image brighter.
With the shutter off, you can change the frame rate by 1/24 second instead of 1/30 second. This may look like a slight decrease, but it will greatly increase the lighting of your videos.
Some cameras allow you to change the frame rate even lower than 24 frames per second. When the shutter is turned off, some cameras can shoot at 12 or even 6 frames per second. Although this trick will only work if you are shooting a landscape or a completely still view. This will not work for shooting a dynamic scene such as the movement of an animal or person.
5. Reduce shutter speed
The last technique we’ll talk about is controlling the shutter speed on your camera. Normally, when the shutter speed is slowed down, the footage automatically becomes brighter. As the shutter speed decreases, the camera shutter takes longer to open, allowing more light to the camera.
Low light video should be shot in 1/30 second, not at a normal video shutter speed of 1/60 second. This may seem like a small change to your camera, but it makes a huge difference.
This allows you to keep the shutter open for twice as long as the original setting, which means doubling the amount of light entering the camera. Low light shooting requires as much light as possible for a clip to be of decent quality. When using this method, it is important to understand that it will increase the likelihood of blur when shooting.
Although we did not run into problems with human movement from 1 / 30th of a second exposure. However, shooting larger subjects or faster animals can cause problems.