Razer Nari is compatible with both PC and Xbox One, allowing you to play games on either platform. However, there are only a few things you need to keep in mind before you connect Razer Nari to Xbox One.
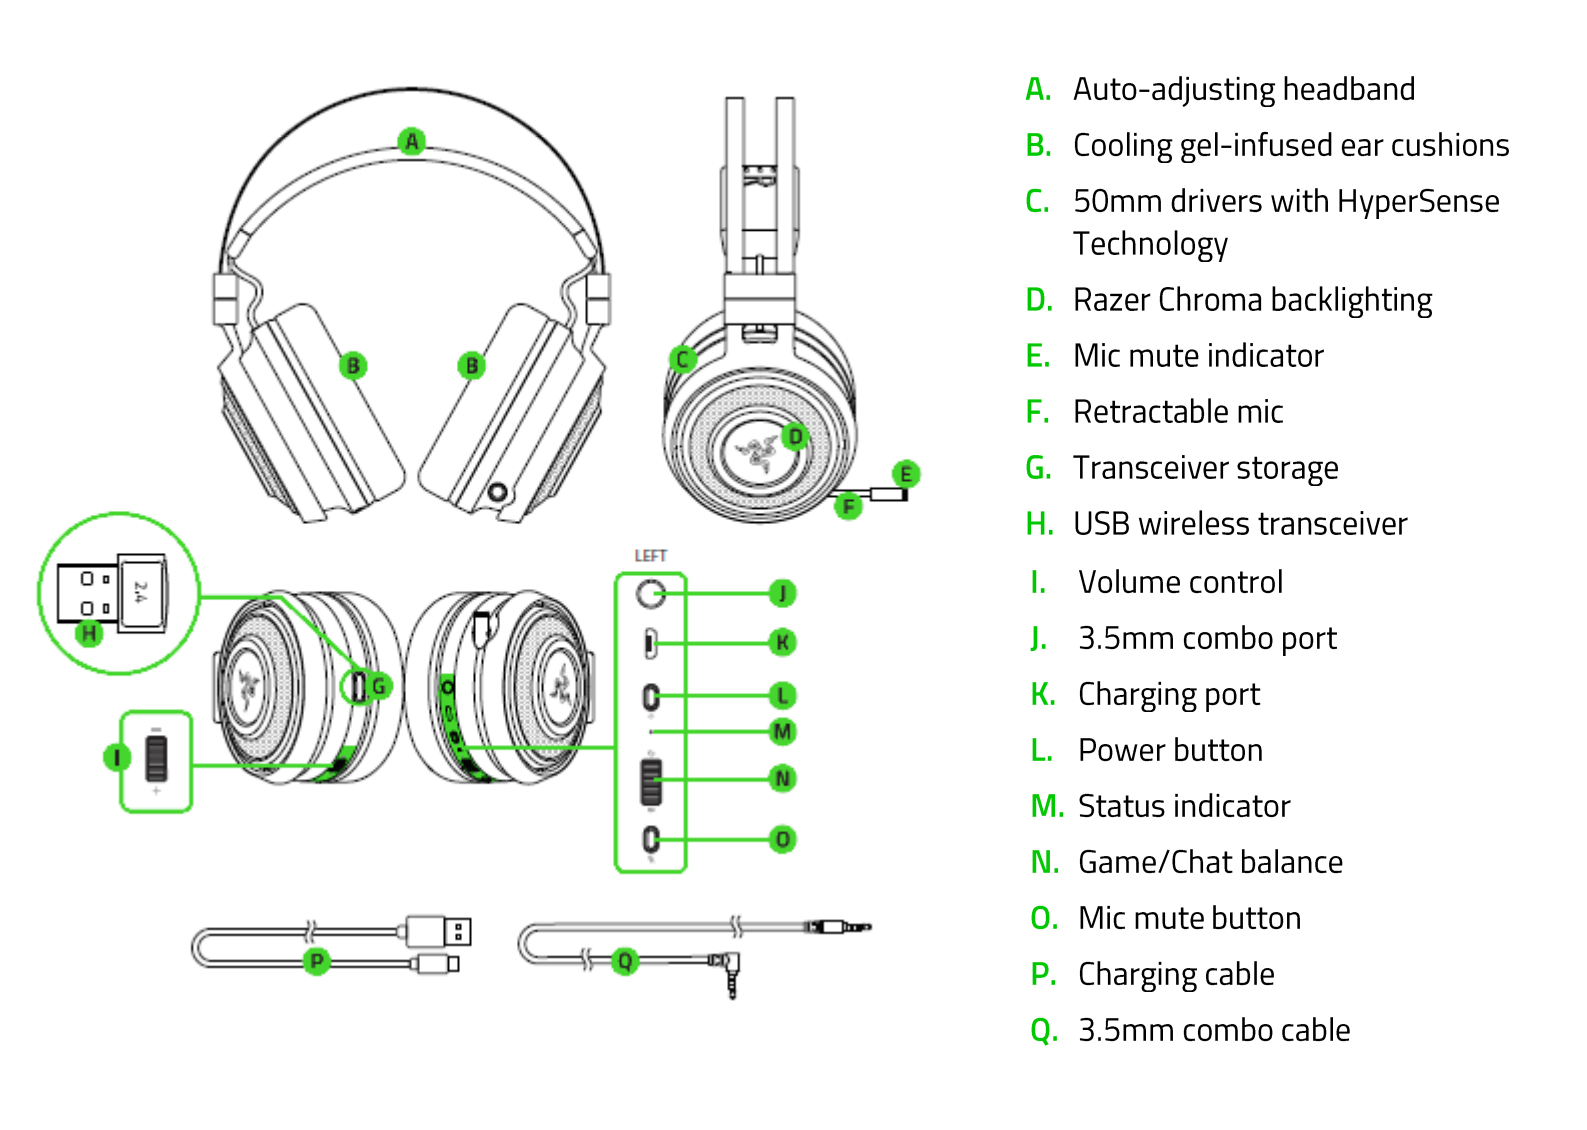
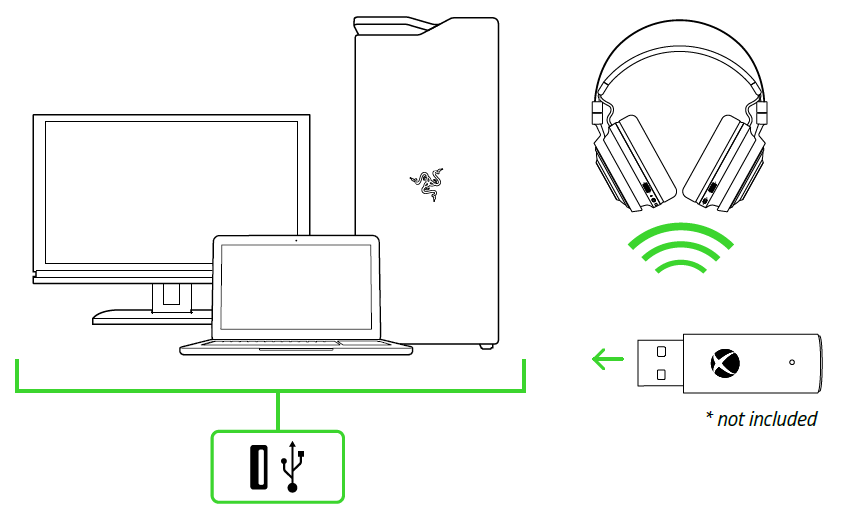
First of all, to use the headset for Xbox One, you will have to pair it with the console first. In order to do that, there is a USB transmitter that comes in the box. Connect the transmitter with any available USB port on your Xbox One and then turn on your controller. Then simply put them together by pressing couple of buttons and voila! You now have a fully functional gaming headset working with your favorite console too!
Second thing you need is an adapter cable with two 3.5 mm jacks, one going into controller and another one attached to Nari headphone jack.
The third thing you might need is an optical audio cable, but that only in case if you want to get a better quality sound.
As for the connection process itself, it’s pretty straightforward. First, take the 3.5 mm adapter and plug it into your controller. The other end of the adapter goes into the headphone jack on Razer Nari. In order to use the mic, you will need to have another 3.5 mm jack going from the controller into the mic input on Nari.
And that’s pretty much it! Now you can freely enjoy using your Razer Nari with Xbox One without any issues whatsoever! Just remember to keep an eye on those batteries – both in your controller and transmitter – and you should be all set!
How to Connect Razer Nari ultimate to Xbox One
- Start by turning on your Xbox One console.
- Press the Menu button on your controller to open the guide.
- Go to Settings > Devices & connections.
- Select Bluetooth devices and then add a new device.
- Put your Razer Nari into pairing mode by holding down the Mute button and the Low Frequency Oscillation button for 3 seconds. The LED on the earcup should start blinking rapidly, indicating that it is in pairing mode.
- Once your Razer Nari appears in the list of available devices, select it to connect.
- You should now be able to use your headset with your Xbox One console!
Tips and tricks for using the Razer Nari with Xbox One
- Keep your batteries fresh and charged – both in the controller and the transmitter – as this will ensure smooth and uninterrupted gameplay.
- Make sure to check for firmware updates for both your console and your headset, as these can often provide important improvements and bug fixes that will help you get the most out of your Razer Nari with Xbox One.
- If you are experiencing any issues with audio or voice quality, be sure to adjust the settings on both your headset and your console until you find a setting that works best for you.
- Consider using an optical audio cable if you want to take advantage of surround sound capabilities, as these typically offer higher quality audio than traditional 3.5 mm cables.
How connect your razer nari to a Windows 10
- Start by ensuring that your Razer Nari is turned off.
- Connect the wireless adapter to a USB port on your PC.
- Press and hold the Power/Mute button on your headset for 3 seconds to turn it on.
- Once your headset is on, open the Settings app from your Start menu.
- Go to Devices > Bluetooth & other devices and then select Add Bluetooth or other device.
- Select Bluetooth from the list of available options and then wait for your PC to scan for nearby devices.
- Once your Razer Nari appears in the list of available devices, select it to connect.
- You should now be able to use your headset with your Windows 10 PC! Enjoy gaming and listening to music and other audio with your Razer Nari!
Additional tips for using the Razer Nari with a PC
- Before you begin using your headset, be sure to check for any firmware updates that may be available for both your PC and your headset. These updates can often improve compatibility or add new features, so it’s always a good idea to keep both up-to-date.
- If you encounter any issues with wireless connectivity or audio quality when using the Razer Nari with a Windows 10 PC, try adjusting some of the settings in the Windows 10 Sound menu as well as on your headset itself until you find a configuration that works best for you.
Check out that the Mic is Ready to Use
One of the most important things to check when trying to use a Razer Nari with your PC or Xbox One is that the mic is ready to use. To do this, simply make sure that the mic button on your headset is illuminated and that it is connected properly to your computer or controller. If you are having trouble getting the mic to work, try resetting your headset by holding down both the power/mute button and the low frequency oscillation button for 5-10 seconds until you see an indicator light flash on the ear cups.
This should help resolve any issues you might be experiencing with your microphone. Additionally, it may also be useful to adjust some of the settings in Windows 10 or on your headset itself, such as changing the mic sensitivity or the volume levels.
Final thoughts on using the Razer Nari with PC and Xbox One
Whether you are looking for a comfortable gaming headset that offers excellent sound quality and features innovative haptic feedback technology, or simply want to use your existing Razer Nari with your console or computer, there are plenty of ways to get the most out of this versatile headset.
No matter what system you choose, be sure to keep both the firmware updated on your headset and in the device you will using it with, adjust any available settings until you find a combination that works best for you, and always remember to check that your mic is ready to use before starting a game or recording. With these tips and tricks, you should have no trouble connecting and using your Razer Nari with PC or Xbox One!